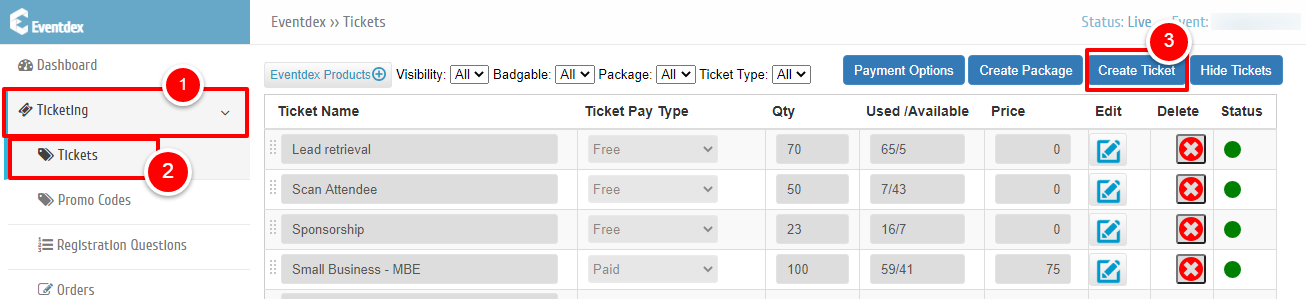
Step 1. Go to Eventdex Portal >> Login with your credentials >> Select your Event.
Step 2. Click on the “Ticketing” section and from its accordion menu, click on the “Tickets” subsection.
Step 3. Click on the “Create Ticket” button.
Step 4. Enter the Ticket details.
Ticket Name: Name to be displayed on the Ticket.
Ticket Pay Type: Select any one ticket pay type – Paid/Free/Donation.
Quantity: Total number of tickets you want to create.
Price: Price for each ticket.

Step 5. To add more Ticket information, click on the 5th icon shown in above picture.
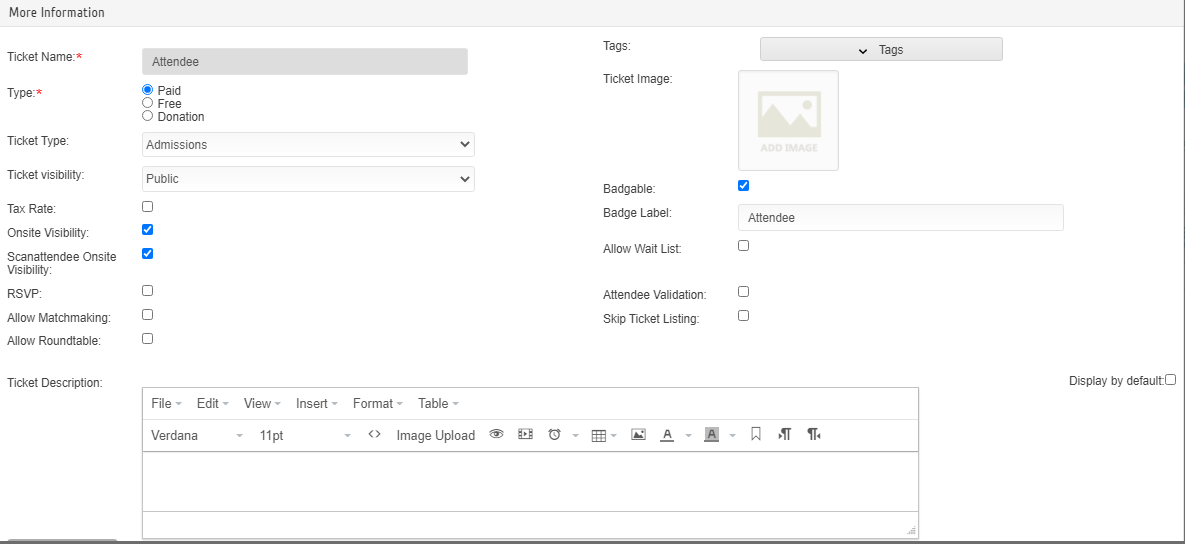
Ticket Type: Choose from the drop-down list of different ticket types.
Tickets:
- Admission: This ticket type is used to differentiate the attendee as a simple admission.
- Exhibitor: This ticket type is used to differentiate the attendee as an Exhibitor.
- Sponsor: This ticket type is used to differentiate the attendee as a sponsor.
- Speaker: This ticket type is used to differentiate the attendee as a Speaker.
- Seats: This ticket type is used to pick the seats from a predefined layout (In development).
- Seminars: This Ticket type is used to create seminars.
- Booths/Tables: This ticket type is used to view the exhibitors in exhibitor tile in Eventdex App
- Sponsorship: This ticket type is used to view the sponsors in the sponsor tile in Eventdex App.
- Items: This ticket type is to add the items.
- Staff Admissions: This ticket type is used for staff admissions.
Eventdex Products:
- Lead retrieval: This ticket gives an exhibitor access to Eventdex’s lead retrieval app.
- MatchLeads Buyer: This ticket gives access to corporates/buyers who want to meet one on one with the small businesses/sellers.
- MatchLeads Seller: This ticket gives access to small businesses/sellers who want to meet one on one with the corporates/buyers.
- Scan Attendee: This ticket gives access to the Scan attendee app for Event admin/Organizer to check statistics, sell tickets, register attendees, print badges, check-in/out attendees.
Ticket Visibility: Public, Private, Closed.
- Public – Ticket visibility is public,
- Private – Need to share Private Registration Link,
- Closed – Ticket will not display on Registration Page.
Tax Rate: You have an option to turn ON/OFF Tax for a single ticket.
Onsite Visibility: Enable it to display the tickets for Self-Service Quick registration.
Scan attendee Onsite Visibility: Enable it to display the tickets for self-check-in mode and from the app.
Allow Matchmaking: Enable this option if this ticket holder is participating in Matchmaking.
Allow Roundtable: Enable this option if this ticket holder is participating in Roundtable.
Tags: Add Tags to a Ticket.
Ticket Image: Add an image to a ticket (image size cannot be greater than 100kb).
Badgable: Enable it to make this ticket badgable.
Badge Label: It defines the label of the badge.
Allow Wait List: Enable it to allow waitlist.
Allow Wait List: Enable this option if this ticket holder is on waitlist if there is a demand on sales.
Attendee Validation: Enable it to validate the email ids of the registrants for any offer applied to their ticket purchased.
Skip Ticket Listing: Enable this option to skip the ticket selection at the registration page. Users will be redirected to the form to fill in the information.
Ticket Description: You can add a short description to the ticket.
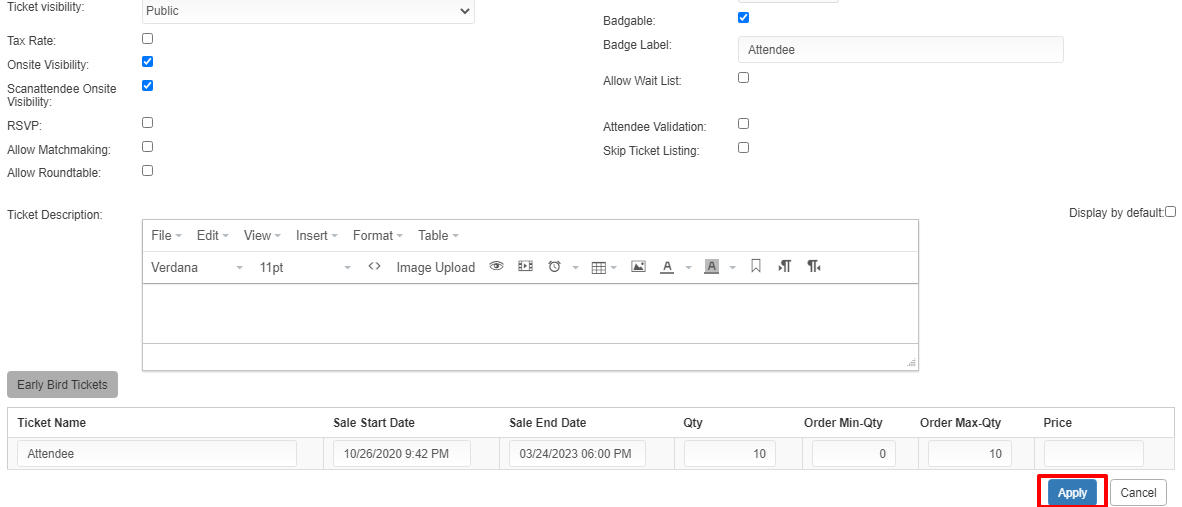
Sale Start Date: Ticket sale start date.
Sale End Date: Ticket sale end date.
Qty: Ticket quantity.
Order Min-Qty: Minimum Ticket quantity that a registrant should purchase..
Order Max-Qty: Maximum ticket quantity that a registrant can purchase.
Price: Ticket price.
Step 7. Click on the “Apply” button to confirm the entries or click on the “Cancel” button to exit the screen.
Step 8. Click on the “Save” button to confirm the entries or click on “Cancel” to exit the page.

Please go through our YouTube link: https://www.youtube.com/watch?v=NN2h0V488ug.